Review: F4I H.S.P. streetfighter gauge stay

 06-22-2010, 08:46 AM
#22
Registered User

Join Date: Aug 2006
Location: Columbus ,OH
Age: 41
Posts: 1,235
 06-22-2010, 03:30 PM
#23
Registered User

Join Date: May 2010
Location: Tampa Fl
Posts: 197
Re: Review: F4I H.S.P. streetfighter gauge stay
06-23-2010, 01:01 PM
#25
Registered User
Join Date: May 2010
Location: Tampa Fl
Posts: 197
Re: Review: F4I H.S.P. streetfighter gauge stay
I was only play'n... Factory pro makes them for about $60. As far as the sync is concerned you gotta go to a bike shop and get it done or buy the sync tool like bryan and i did, we do ours 2 times a month! Motion pro makes one for about $100.
06-23-2010, 03:07 PM
#26
Registered User

Join Date: Jun 2009
Location: Lincoln NE USA
Posts: 74
Re: Review: F4I H.S.P. streetfighter gauge stay
+1 for syncing... my F4i never bogs! Holly wood and Guinea did it before I bought it. Rode a buddies F4i a couple weeks ago and was ready to ride it into a lake!
06-23-2010, 03:11 PM
#27
Registered User

Join Date: Oct 2004
Location: Anywhere wheelies happen
Age: 37
Posts: 5,869

Re: Review: F4I H.S.P. streetfighter gauge stay
I checked mine after 6 months and they were spot on!
 my f4i,during idle on2wheels, runs w/a crazy "up&down" idle! so irratice that it'd be foolish2try&do christs!! would tha sync help w/this prob also?
06-24-2010, 12:31 PM
my f4i,during idle on2wheels, runs w/a crazy "up&down" idle! so irratice that it'd be foolish2try&do christs!! would tha sync help w/this prob also?
06-24-2010, 12:31 PM
#29
Soup Mafia
Thread Starter
Join Date: Sep 2006
Location: Vero Beach, Fl USA
Age: 35
Posts: 7,922
06-24-2010, 09:25 PM
#31
Registered User
Join Date: Mar 2008
Location: Hurst, TX
Posts: 295
Re: Review: F4I H.S.P. streetfighter gauge stay
http://www.carbtune.com/
Or you can make your own ghetto-fab clapped out set up. It will still be good enough to sync the throttlebodies. Pretty decent little how to from the R6 forum.
First you will want to get a wooden yardstick from your local hardware store. It will look something like these...

This is what you will use as the base for your manometer.
Next you will need about 35' of clear plastic vinyl tubing. You want 1/4 " to make your manometer. The 1/4" inch size refers to the I.D. of the tubing.

This tubing will be used to make the individual channels for your manometer. Now you will have to go to the gardening section to find the next parts. You will need 2, 1/4" connecting T's, and 4, 1/4" coupling nipples. they look like these.


These are what will connect the tubing together. The T is for the individual channels and the coupler nipples are to go to the throttle bodies.
Now you need to assemble everything. Take the clear tubing and cut it into 4 equal lengths. They don't have to be exact but it helps the closer they are in length. Then you will want to cut about a 1/2" to 3/4 " inch off of one of the lengths of tubing. This short length will be used to connect the 2 T's together. Then you will connect a length of tubing to each of the other nipples left on the T connector. The 4 coupling nipples will go on each end of the 4 tubes that come from the T's. It should look something like this.

This isn't mine but is very similar in construction and shows in good detail how the manometer is put together. As you can see there are now 4 tubes that can hold a fluid and will self calibrate thanks to good old gravity. Yours will be smaller in scale to this one since it will be installed on a yardstick. Use ZIP TIES to fasten the tubes to the yardstick. You will want to keep them as straight as you can and you should run zip ties up to about the last 6" of the yard stick. You will want to drill a hole in the yard stick at the top to hang it from. Each run going up the yardstick will represent a paticular cylinder or throttle body on the bike. You will want to keep track of what tube is where. It is important that the tubes line up in the order that they will be attached to on the throttle bodies. 1-1, 2-2 etc. This guy here crossed his at the bottom. This is not a big deal as long as you know which tube goes where. In the picture above tube 3 is crossed over and is now actually connected to throttle body #2. Just line the tubes up in the proper order and you won't have issues. Also be sure that there are no kinks in the tubing at the bottom. The length is not important since they will self calibrate regardless. You will then need to fill the tubes with some sort of fluid. Water, new engine oil, used engine oil, anti freeze, anything can be used. Try to stick to products that won't hurt the engine. Things like MERCURY are not suggested. You will only need to have about 6" or so of fluid in the monometer to have enough range to work. The whole thing will look something like this. Again not mine but shows the simple construction.

This is what you will use as the base for your manometer.
Next you will need about 35' of clear plastic vinyl tubing. You want 1/4 " to make your manometer. The 1/4" inch size refers to the I.D. of the tubing.
This tubing will be used to make the individual channels for your manometer. Now you will have to go to the gardening section to find the next parts. You will need 2, 1/4" connecting T's, and 4, 1/4" coupling nipples. they look like these.
These are what will connect the tubing together. The T is for the individual channels and the coupler nipples are to go to the throttle bodies.
Now you need to assemble everything. Take the clear tubing and cut it into 4 equal lengths. They don't have to be exact but it helps the closer they are in length. Then you will want to cut about a 1/2" to 3/4 " inch off of one of the lengths of tubing. This short length will be used to connect the 2 T's together. Then you will connect a length of tubing to each of the other nipples left on the T connector. The 4 coupling nipples will go on each end of the 4 tubes that come from the T's. It should look something like this.
This isn't mine but is very similar in construction and shows in good detail how the manometer is put together. As you can see there are now 4 tubes that can hold a fluid and will self calibrate thanks to good old gravity. Yours will be smaller in scale to this one since it will be installed on a yardstick. Use ZIP TIES to fasten the tubes to the yardstick. You will want to keep them as straight as you can and you should run zip ties up to about the last 6" of the yard stick. You will want to drill a hole in the yard stick at the top to hang it from. Each run going up the yardstick will represent a paticular cylinder or throttle body on the bike. You will want to keep track of what tube is where. It is important that the tubes line up in the order that they will be attached to on the throttle bodies. 1-1, 2-2 etc. This guy here crossed his at the bottom. This is not a big deal as long as you know which tube goes where. In the picture above tube 3 is crossed over and is now actually connected to throttle body #2. Just line the tubes up in the proper order and you won't have issues. Also be sure that there are no kinks in the tubing at the bottom. The length is not important since they will self calibrate regardless. You will then need to fill the tubes with some sort of fluid. Water, new engine oil, used engine oil, anti freeze, anything can be used. Try to stick to products that won't hurt the engine. Things like MERCURY are not suggested. You will only need to have about 6" or so of fluid in the monometer to have enough range to work. The whole thing will look something like this. Again not mine but shows the simple construction.
Last edited by ~03~raven; 06-24-2010 at 09:29 PM. Reason: add pics
06-25-2010, 03:33 AM
#34
Free Riders
Join Date: Jun 2010
Location: Natick, Ma, USA
Age: 35
Posts: 225
Re: Review: F4I H.S.P. streetfighter gauge stay
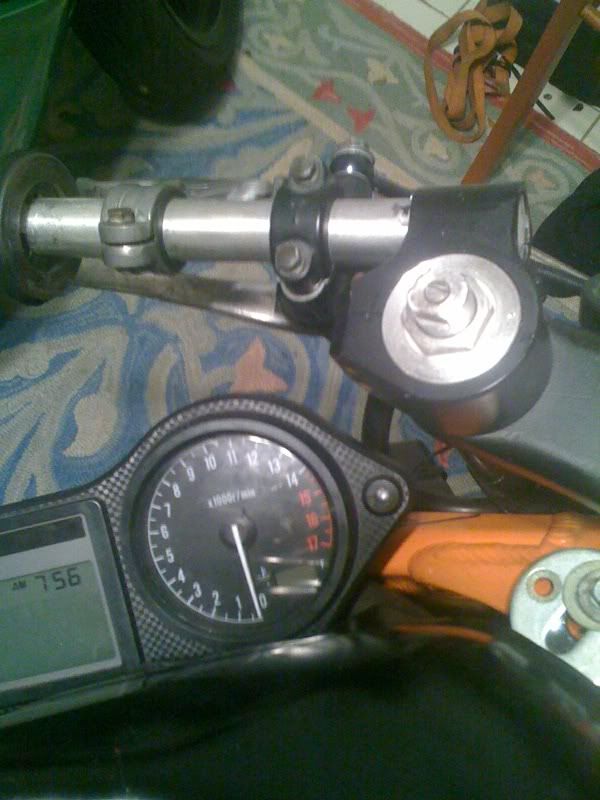
what the hell do you guys do with your ignitions?!
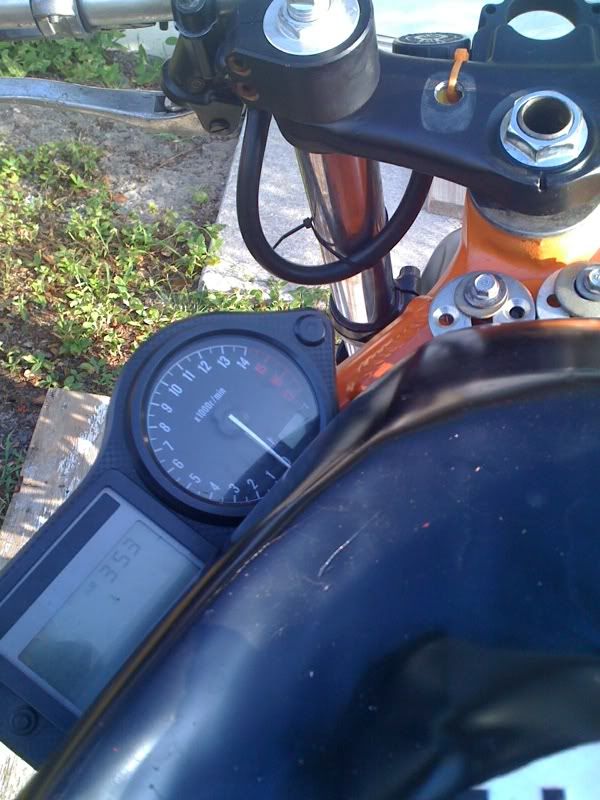
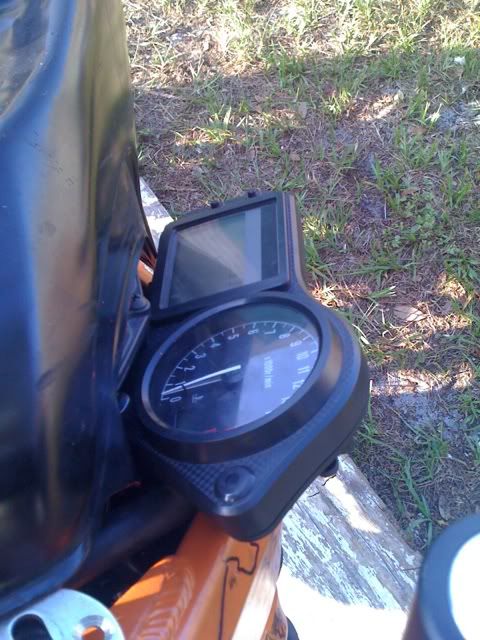
F4I HSP( hollywodd stunt products) gauge stay.
ok ive never ran gauges on my f4i because there big and i couldnt find a convienant place to put them and still be able to see them, my 636 gauses were small and i could mount them to my cage but these f4i ones are like a brick. when i first saw this design i hated it, i figured i would get hung up on pulling in and out of straightline and im very picky about the path being clear so i wasnt even gonna think about getting this product.
well sunday my friend mini guinea was meeting me in orlando to sync my throttle bodies and said he would let me try this bracket if i wanted all i had to do was review it. to be honest i kinda didnt even wanna bother mounting this thing because i figured i was just gonna have to pull it right back of hahaha. so i ended mounting it and had a fresh sync so i went right into some straitline whoolies. tried not to think of it being there and pulled into 50/50 with no problems, pulled back out didnt get caught up, jumped to spreader and pulled thru to highchair and back out no problem 50/50 to strangler back to 50/50 no problems and i was stoked, did a few more passes just to make sure it wasnt luck and same result i didnt get caught up. so now i think its a awesome product.
so.
doesnt get in the way of of pull thrus
easy to mount and solid(attachs to the cross bar of the frame), bars dont hit it when tripple is full locked
not in the way for pulling the gas tank and airbox( been pulling those 2 for the past 2 days because my idle cable broke )
)
can see my oil light come on, what my temp is and exact idle at all time.( my speedo is way off, it said i was going 120 mid 3rd gear with a 68 tooth sprocket lol)
anyone have any questions about this thing or wants me to check i will honestly test it to the best of my abilitys and give a honest answer.
ok ive never ran gauges on my f4i because there big and i couldnt find a convienant place to put them and still be able to see them, my 636 gauses were small and i could mount them to my cage but these f4i ones are like a brick. when i first saw this design i hated it, i figured i would get hung up on pulling in and out of straightline and im very picky about the path being clear so i wasnt even gonna think about getting this product.
well sunday my friend mini guinea was meeting me in orlando to sync my throttle bodies and said he would let me try this bracket if i wanted all i had to do was review it. to be honest i kinda didnt even wanna bother mounting this thing because i figured i was just gonna have to pull it right back of hahaha. so i ended mounting it and had a fresh sync so i went right into some straitline whoolies. tried not to think of it being there and pulled into 50/50 with no problems, pulled back out didnt get caught up, jumped to spreader and pulled thru to highchair and back out no problem 50/50 to strangler back to 50/50 no problems and i was stoked, did a few more passes just to make sure it wasnt luck and same result i didnt get caught up. so now i think its a awesome product.
so.
doesnt get in the way of of pull thrus
easy to mount and solid(attachs to the cross bar of the frame), bars dont hit it when tripple is full locked
not in the way for pulling the gas tank and airbox( been pulling those 2 for the past 2 days because my idle cable broke
)can see my oil light come on, what my temp is and exact idle at all time.( my speedo is way off, it said i was going 120 mid 3rd gear with a 68 tooth sprocket lol)
anyone have any questions about this thing or wants me to check i will honestly test it to the best of my abilitys and give a honest answer.
06-25-2010, 09:40 AM
#35
sack up or pack up!!!
Join Date: Feb 2008
Location: dirty five thirty..bish!!!!
Age: 47
Posts: 2,938
06-25-2010, 12:20 PM
#36
Soup Mafia
Thread Starter
Join Date: Sep 2006
Location: Vero Beach, Fl USA
Age: 35
Posts: 7,922
Re: Review: F4I H.S.P. streetfighter gauge stay
right side by the air box run the ignition up under the cross rail on the frame and secure, i used to just mount it on top of the rail or airbox but i kicked my key off when it was there lmao.

Thread
Thread Starter
Forum
Replies
Last Post
nsschwenk
Bike Parts Wanted
3
10-16-2012 06:34 PM

